Sensor installation :
In order to respect soil structure and get a perfect contact sensor / soil, only use the dedicated spiral auger to make pre-holes (boutique), as explained in vidéos.
Operation :
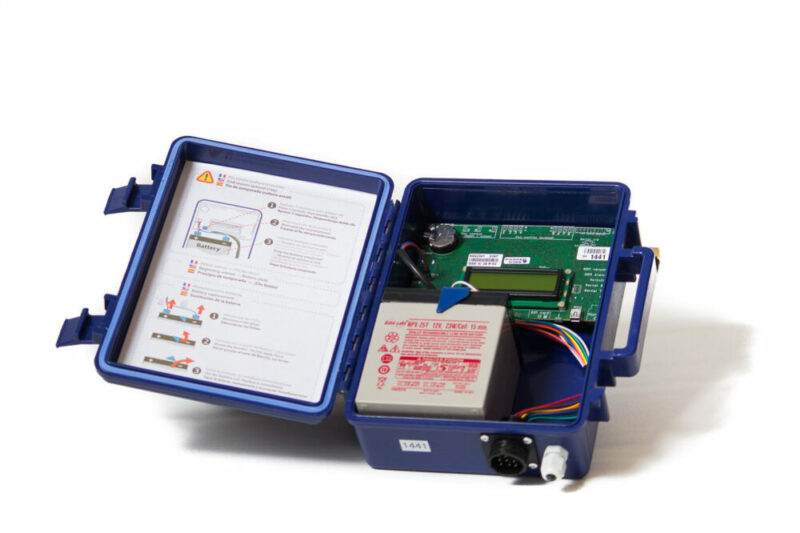
MicroSD storage :
Monitor R2-DL n°3456 (for example) stores its measurements in a file 03456.csv, on its microSD card. This file must not be renamed. If necessary, work on copies.
This microSD card (2 Mo = decenies of storage) stands on the right side of the electronical board (metallic side upwards).
This file 03456.csv can be sent on line, on the account open on Challenge Agriculture platform, to get the graph 3456 on line. By connecting the microSD to a smartphone or computer, opening the Web account and following the instructions.
To avoid coming back on site, one can replace the microSD.
Starting season :
Monitor R2-DL starts a season at first clic on the bleu button. At first clic, Monitor starts measuring cycles.
Ending season :
To avoid consuming batteries in useless cycles, the Monitor is turned to Endseason status, as soon as the season is over.
Follow instructions on sticker inside the door : Press button during 4 seconds, the screen flashes and proposes endesason (fin de saison) Validate with 2 very quick clics (clic-clic). All diods turn off.
Power supply
Battery life
6 disposable alcaline batteries LR6 supply 9.6 V when new, give approx 12 month of autonomy, ending around 6 V.
6 rechargeable LR6 batteries. supply 9 V when fully charged, for approx 9 months. To be recharged before 6 V.
Cell battery : do not touch.
A 3v Li cell battery (top left of board) powers the clock, that wakes up the Monitor for tasks. This cell is soldered and siliconed to avoid chocs and vibrations that would disrupt the clock (back to year 2000). In this case, contact us.
Secure the Monitor on its stake. The pvc tube, ballasted with sand, is strongly threaded 50 cm into the soil. In orchards, avoid to hang on structure poles, that could intensively vibrate with wind.
Transportation of Monitor should avoid chocs and vibrations.
Connexion of sensors, rain gauge :
Protection disconnect :
The tipping bucket should always stand on one side. Never in the middle, means short cut, the Monitor would disconnect the rain gauge.
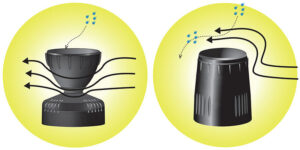
Good operating conditions for a rain gauge :
clean regularly : debris, loam, insects can obstruate the cone.
perfectly horizontal, means on a strong perfectly vertical pole, to avoid asymetric tipping
rebound of water waves under gun, when drops land too big.
wind disturbance : a new profile of cone improves rain sampling.
Test of packs of WATERMARK ® sensors
Caracteristics and longevity of sensors are described on this page sur cette page.
First inspect the “skin” of sensor. If a hole is detected with loss of material, the sensor is lost.
Immerse the lower part of the clean sensor during 2-3 minutes in 6 cm of water, at room temperature.
Do not let water enter the drain hole at bottom of PVC tube, to avoid test distorsion.
After complete depletion or a season in fine loams, sensors can take minutes to stablize.
Tension should stabilize beetween 0 to 10 Cbars.
Avoid prolonged immersion that would accelerate aging of sensors.
Desintallation of sensors
Check list : jerrycan of water, Extracteur , déposette (voir vidéo).
Method : fill the tube of each sensor with water (to allow relax the soil around the sensor) included the soil temperature. Replace firmly the black cap to block the wires inside the tube.
Once the 3 positions completed, the first position should be ready. Pinch gently the pvc tube of the short sensor first, 2 cm above soil, with the grip.
Re-conditionning of packs : see this vidéo cette vidéo
Storage of sensors and new season :
Store in a dry place, away from polluants, grease, etc ..
Just before installation, saturate the sensors : 2-3 minutes in 6 cm of water.
With a good installation, sensors will be equilibrated the following day.